1.5: Permission
Chapter 5
Introduction
Linux is a multi-user operating system. In order to access a system, we need credentials, user id and a key or token. I did not use the term “password"; though it is the predominant way of gaining access, it is not the only way. Once we login to the system, we typically create and view files and directories. Since multiple users can login at the same time, Linux provides mechanism to avoid conflicts in creation and usage of files. This is accomplished thru permissions.
Authentication and Authorization
When we talk about permissions in Linux, we typically mean who are authorized to access a file and what kind of access the user(s) have. This is the main topic of this chapter. However we must be aware of a different type of permission that deals with gaining access to the system itself before we can access any file. Let us briefly discuss about authentication and authorization.
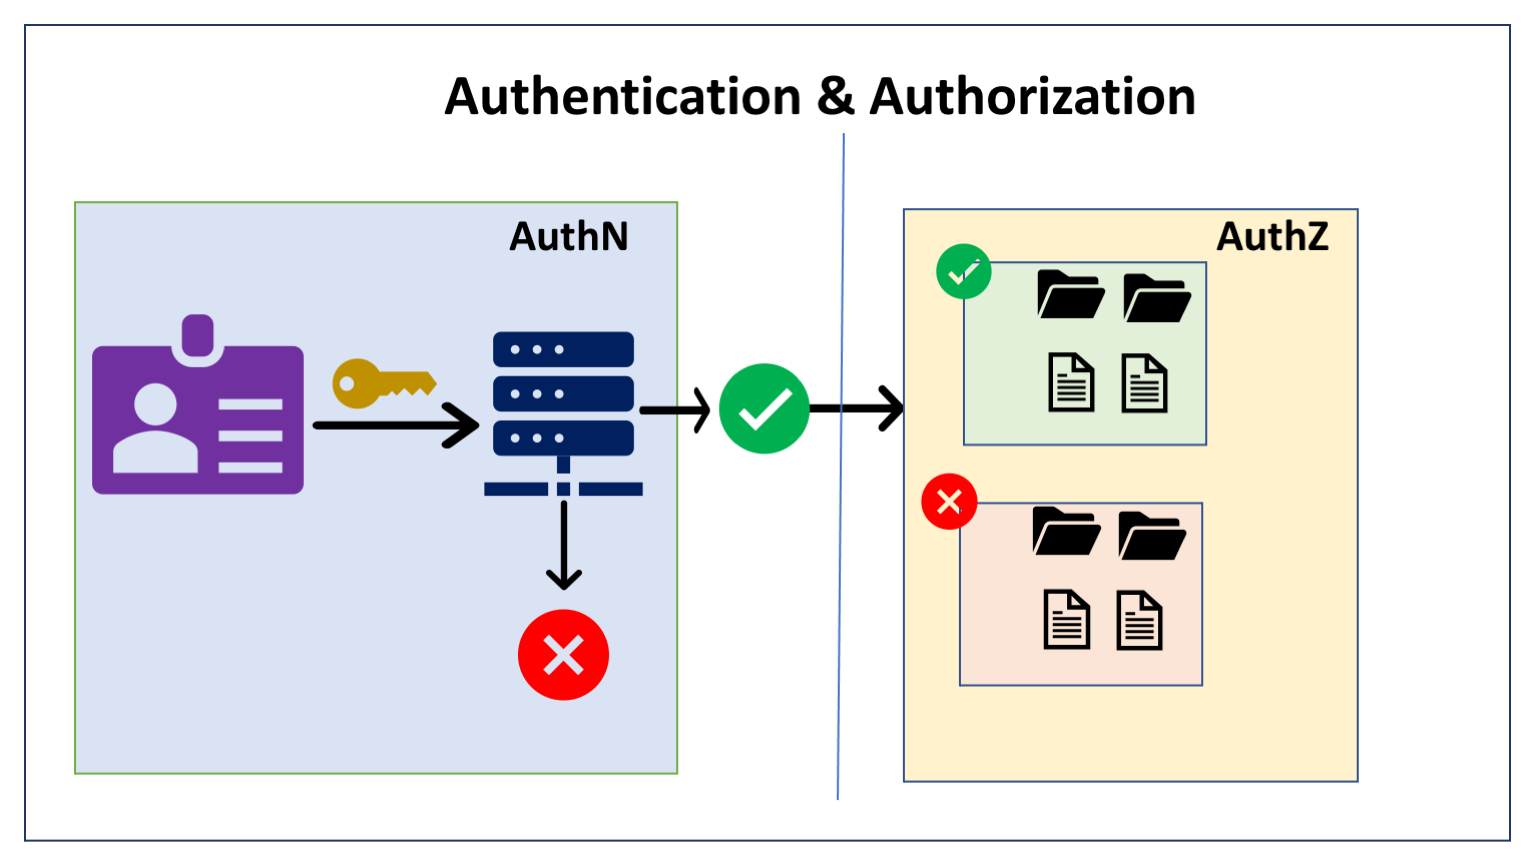
Authentication (AuthN)
Authentication is a mechanism that is used by the machine to validate the user’s identity. Typically, it is done using an userid and a password. There are other options like SSH keys that can be used in place of password. This is called Single Factor Authentication (SFA).
Nowadays, systems use Multi-factor Authentication (MFA) that expects a token generated from a trusted device in addition to the SFA. The MFA setup uses physical devices like RSA Tokens or applications such as Google Authenticator that generates numeric token that should be entered after user id and password. Other methods of MFA include OTP - One Time Password, Fingerprint authentication using external applications etc..
In the Linux servers, a sysadmin typically creates an user credentials with settings like password length, allowed characters, number of days before user need to change the password. This is not something we need to know as a general user. We will briefly discuss the commands used for awareness. Once you have credentials, then the authorization part takes over.
The below commands will be used by Sysadmins, These are listed here for completeness
You may play around with these commands using google cloud shell, if you are interested. Access the
manpage for additional information.
For demo purpose, I have created few users and groups on GCS that will be used in this chapter and later when we discuss the
findcommand.
| # | Name | Description |
|---|---|---|
| 1 | useradd |
create new user id |
| 2 | adduser |
same as useradd, some installation have this one |
| 3 | usermod |
modify an existing user info |
| 4 | userdel |
delete user |
| 5 | groupadd |
creating new group |
| 6 | groupmod |
modify an existing group info |
| 7 | groupdel |
delete group |
Authorization (AuthZ)
Authorization deals with access rights, that is, what the user can view, change or do once the authentication is successful. This is the main focus of this chapter. We will look into different aspects of permissions associated with the files and directories with respect to the users and the actions they can perform on these files and directories.
File Permissions
Everything in Unix is treated as files and every file has an owner and explicit access permission associated with it. The permissions determine who can have access to these files and what type of access they have. We have already discussed about Authentication and Authorization. In this section, we will look into authorization and understand how the system determines who have access to which files and directories.
Permissions are associated with various actors in the system and the files and directories can have different access associated with them. The owner or the super user or root user can perform various actions in terms of providing permissions to various actors.
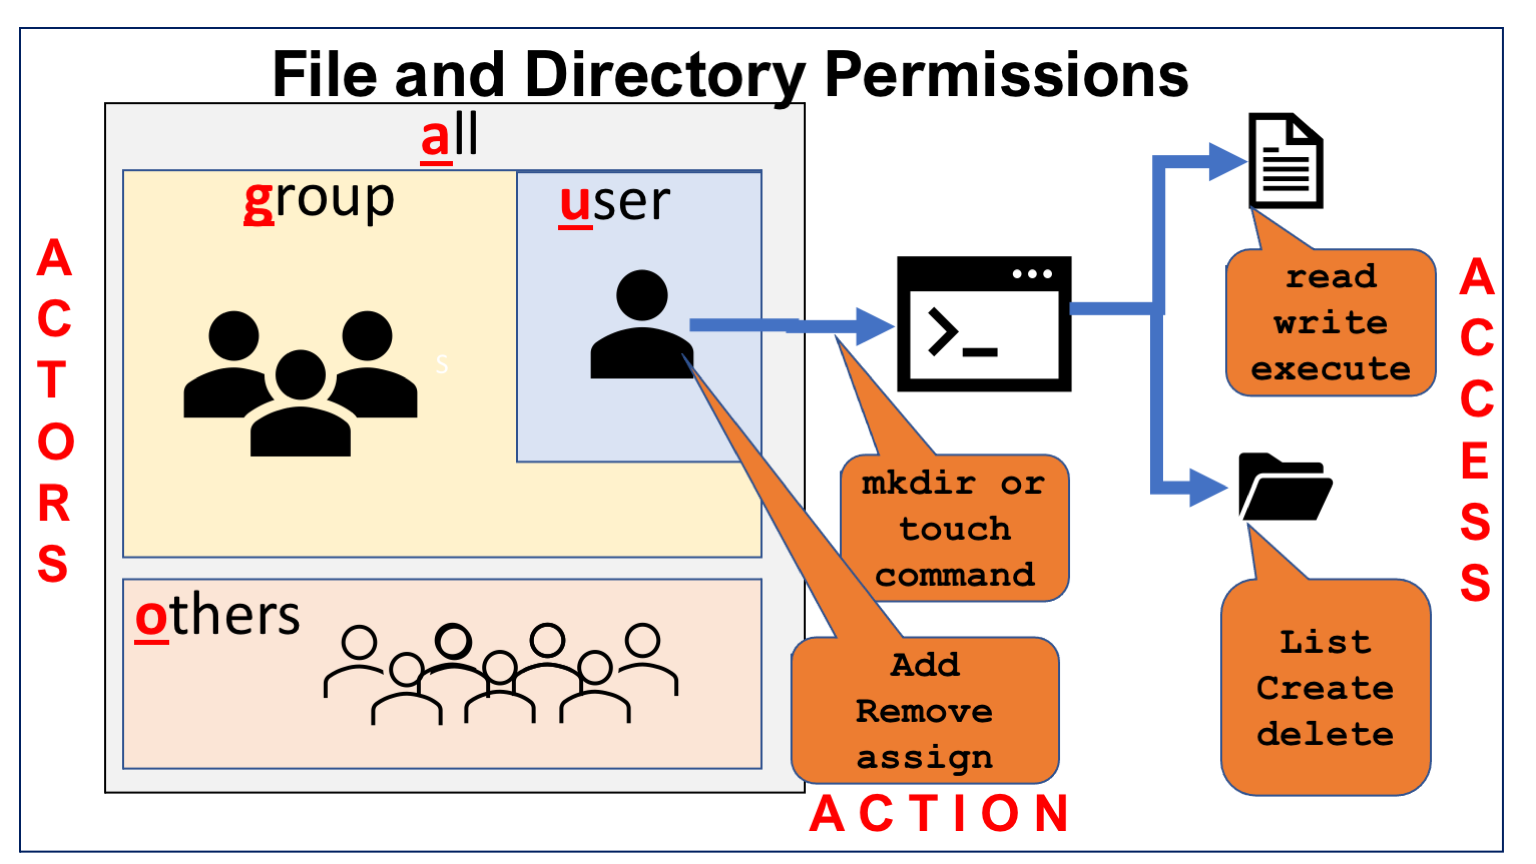
The abbreviations listed in the actors, access and actions tables below are used in the commands related to granting or revoking permission to files and directories.
Actors
| Name | Abbr | Description |
|---|---|---|
| User | u | owner of the file |
| Group | g | default group the owner belong to |
| Others | o | users that are not part of the group |
| All | a | every user in the system |
Actions
| Name | Abbr | Description |
|---|---|---|
| Add | + | add permission |
| Remove | - | remove permission |
| Assign | = | discard existing permissions and assign new permissions |
Access
| Name | Abbr | Description |
|---|---|---|
| Read | r | reading from files |
| viewing contents of directories | ||
| Write | w | writing into files |
| create, delete files and directories | ||
| Execute | x | execute files (code) |
| view or modify metadata of files | ||
| User | u | set same permission as owner; g=u |
| Group | g | set same permission as group; o=g |
| Others | o | set same permission as others; g=o |
Permissions can be assigned to user, default group and others. We can provide three type of access; read, write and execute or assign the existing permission of one actor to another. The combinations ranging from no permission to all permissions. There are 8 combinations derived from these three type of access that can be represented in Octal notation. Numbers 4, 2 and 1 are assigned to read, write and execute and the combinations of these access gets the other values between 0-7.
We have already seen the permission associated with the file or directory thru
lscommand with-loption.
Permissions can be given using the
chmodcommand either by using actors, actions and access notation or using octal notation
| Num | Permission | Description |
|---|---|---|
0 |
--- |
no permission |
1 |
--x |
execute only |
2 |
-w- |
write only |
3 |
-wx |
write and execute |
4 |
r-- |
read only |
5 |
r-x |
read and execute |
6 |
rw- |
read and write |
7 |
rwx |
read, write and execute |
Commands: File Permission
The following commands are used to
- view existing permissions on files and directories
- view default permissions used when we create files
- add / remove / assign permission
- information about users, groups, files and directories
| # | Name | Description |
|---|---|---|
| 1 | umask |
view or set default permission |
| 2 | ls |
view permission info using ls -l option |
| 3 | stat |
view permission and other file stats such as size, owner,.. |
| 4 | mkdir |
create directory and override the default permission using -m MODE option |
| 5 | chmod |
change permission on files |
| 6 | chown |
change owner of the file |
| 7 | chgrp |
change group name associated with the file |
| 8 | id |
get info about an user; uid, default group and other groups an user is associated with |
| 9 | groups |
get group info of an user |
| 10 | passwd |
change password for current user or user as argument |
Setting up the stage
In this demo, we are going to view info about users and groups, permission details of files and directories, change owner and group associated with files and directories. In order to perform these activities, we need to setup some user ids, groups and associate users with one or more groups. Let us setup some files and directories for demo.
Setting up users and groups
Let us create the following users, groups and relationships between users and groups.
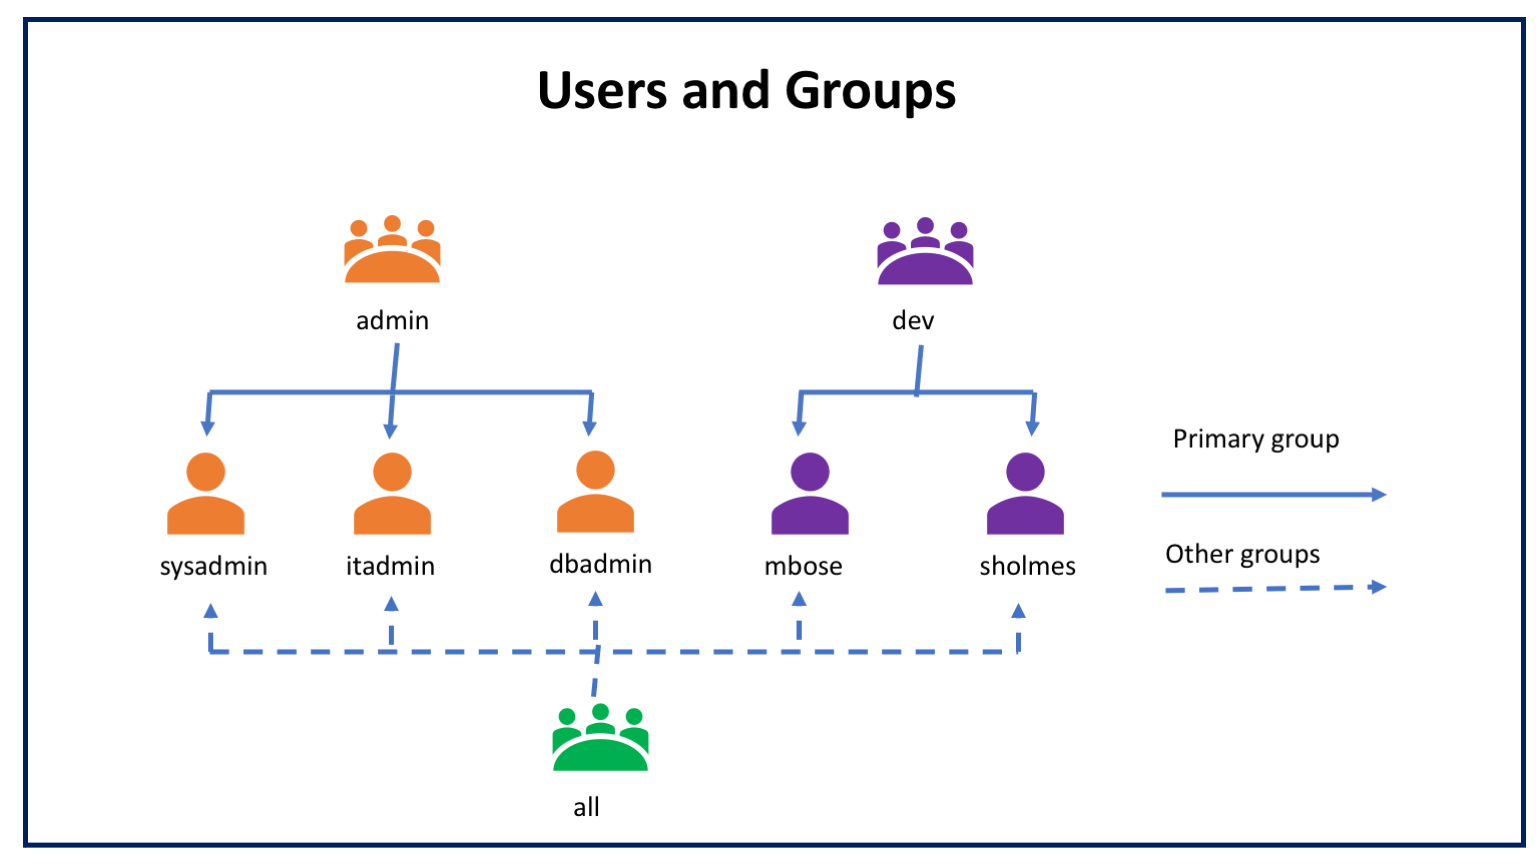
Here is how the users and group are set based on the roles and responsibilities. We will create the users and groups in google cloud shell, which is an ephemeral or temporary Linux environment. Please refer Appendix at the end of the chapter for the actual commands to setup users and groups. We will run the commands to creates these users and groups as a root user, who is a super-user with more privileges compared to normal users.
Note: DO NOT Run this on local machine. If you need to practice, use virtual environments or cloud base environments such as Google Cloud Shell or Amazon Elastic Cloud Computing (EC2) instances
admin (group): users with admin privilegesysadmin: monitor the health of the systemdbadmin: database administrationitadmin: network and security administration
dev (group): developers groupmbose: regular user 1sholmes: regular user 2; trouble-shooter
Setting up test files and directories
Top-level directory for sample files
$ pwd
/home/mktutes/trng/linux

# top-level directory for demo files
$ mkdir 07_perm
$ cd 07_perm
Sample directories
We have created a common directory called bin and each user has a directory under data named after the user id. These user specific directories will be used to demo the chown and chgrp commands.
$ pwd
/home/mktutes/trng/linux/07_perm

$ mkdir -pv bin data/{sysadmin,dbadmin,itadmin,mbose,sholmes}
mkdir: created directory 'bin'
mkdir: created directory 'data'
mkdir: created directory 'data/sysadmin'
mkdir: created directory 'data/dbadmin'
mkdir: created directory 'data/itadmin'
mkdir: created directory 'data/mbose'
mkdir: created directory 'data/sholmes'
Sample files
$ pwd
/home/mktutes/trng/linux/07_perm

$ echo 'print("Hello World")' > bin/hello.py
$ echo 'echo "Hello World"' > bin/hello.sh

# create something similar on the other 4 data/<USER> dirs
# we will change the owner and group of these files
$ date > data/sysadmin/sample.txt
$ date > data/sysadmin/sample.log
$ echo "Hello World" > data/sysadmin/hello.log
umask: set or get default permission
In Linux, there is a default permission associated with every file and directory when it is created. This is done by setting default permission at the system level that specifices what permissions are not allowed for the user, group and others.
We have already seen the octal representation of permission settings. When we run the umask command without any arguments, it returns the octal representation of permission masked for user, group and others. We can override the default permission by passing new set of permissions in octal format.
| Option | Description |
|---|---|
-S |
display permission as symbolic (u, g, o, …) format instead of octal |
The default permission will be usually this. The octal format may be cryptic for beginners. We can use the -S option to display the results in symbolic format. Refer the File Permission section in case you have any doubts about symbolic and octal representation of permission.
# current permission in octal format
$ umask
0022

# current permission in symbolic format
$ umask -S
u=rwx,g=rx,o=rx
- The octal
0022represents the mask that means nothing is masked for user, write is masked for group and others - The symbolic representation shows similar results, where it shows the actual permissions that will be set for user, group and others
ls -l: long listing of files: get permission settings
We have already discussed the ls command that is used to list files and directories. It is one of the first commands we have seen that supports various options. In the context of permission, we will revisit the command with option -l that enables a long-list. With ls -l, we get a 9 column output as follows
- file type and permissions
- number of references associated with the file or directory
- owner of the file
- group to which the owner belong
- file size
- Month in
MMMformat - Day of the month in
DDformat - Time in
HH:MMor Year inYYYYformat; Year if the file is older than 6 months else time - File name
We are interested in the first column alone, which is typically 10 bytes long. The first byte represents the type of file/directory and bytes 2-10 represents the permission string. The 9 bytes are divided into 3 sets that can have the following values.
- Bytes 2, 5 and 8 are for read permission, can be
ror-. - Bytes 3, 6 and 9 are for write permission, can be
wor-. - Bytes 4, 7 and 10 are for execute permission, can be
xor-. - If there is a
-in any of these bytes then the corresponding permission is not enabled.
| Bytes | Actor |
|---|---|
| 2-4 | user |
| 5-7 | group |
| 8-10 | others |
# directory: all permissions for user,
# read and exec for group and others
$ ls -l
drwxr-xr-x 2 mktutes mktutes 4096 Jul 29 03:57 bin
drwxr-xr-x 7 mktutes mktutes 4096 Jul 28 15:26 data

# file: both file has different set of permissions
# looks like the permissions were changed using `chmod`
$ ls -l bin/
-rwxr-x--- 1 mktutes mktutes 57 Jul 29 04:14 hello.py
-rwxr-xr-x 1 mktutes mktutes 41 Jul 29 04:02 hello.sh
stat: get information about files
The stat command produces file status information in a multi-line (human-readable) or single-line (machine-readable). This command produces similar but elaborate file status for a given file or wildcard passed as argument.
We can use the stat command as it is to view the permission string along with other file status info or simply use the --format="%n %f %a" or --format=%n %f %A to view the name, type and permission alone.
stat ARG: as-it-is
$ stat bin
  File: bin
  Size: 4096            Blocks: 8          IO Block: 4096   directory
Device: 811h/2065d      Inode: 131087      Links: 2
Access: (0755/drwxr-xr-x)  Uid: ( 1000/ mktutes)   Gid: ( 1001/ mktutes)
Access: 2021-07-28 15:26:02.662989810 +0000
Modify: 2021-07-29 03:57:02.251138463 +0000
Change: 2021-07-29 03:57:02.251138463 +0000

$ stat bin/hello.
  File: bin/hello.
  Size: 17              Blocks: 8          IO Block: 4096   regular file
Device: 811h/2065d      Inode: 131089      Links: 1
Access: (0644/-rw-r--r--)  Uid: ( 1000/ mktutes)   Gid: ( 1001/ mktutes)
Access: 2021-07-29 03:57:02.251138463 +0000
Modify: 2021-07-29 03:57:02.251138463 +0000
Change: 2021-07-29 03:57:02.251138463 +0000
stat --format= output
we can use
---format=FMT_STRor-c FMT_STR
# permission in symbolic format
$ stat --format="%n %F %A" bin
bin directory drwxr-xr-x

$ stat --format="%n %F %A" bin/hello.py
bin/hello.py regular file -rwxr-x---

# permission in octal format
$ stat -c "%n %F %a" bin
bin directory 755

$ stat -c "%n %F %a" bin/hello.py
bin/hello.py regular file 750
chmod: change mode or permission settings
The chmod command is used to add, remove or assign permission settings to the owner, group or others associated with a file or directory. We can change the settings to any of these actors (u, g, o) or the any combination of actors.
By default each file and directory will have permission settings associated with it at the time of creation. Though this is assigned by default on files, we can override the permission settings for directories at the time of creation using the -m MODE option with mkdir command. However, we can change the permission of files and directories at the later stage using the chmod command. It can done by the owner of the file or the super user.
The chmod command has two syntax variations; one that uses the symbolic representation (u, g, o, +, -, r, w, …) and another that uses the octal representation.
| Symbolic Representation | Octal Representation |
|---|---|
| Relatively easy to understand | Need to remember octal values and combination |
| Can add, remove or assign permission | Only assign permission is supported |
| Granular access can be provided at actor level | Entire permission is overwritten for all 3 actors |
chmod with symbols
Here are some examples
| Arg | Description |
|---|---|
u+x |
add execute permission to user in addition to existing permission settings |
g-w |
remove write permission from group |
o=rx |
discard existing permission for others and assign read and execute |
ugo+x |
add execute permission to user, group and others |
a+x |
same as ugo+x |
go= |
remove all the existing permissions for group and others |
g=u |
assign group the same permission as user |
o=u-w |
assign others the same permission of user and remove the write permission |
Check existing permission settings
$ pwd
/home/mktutes/trng/linux/07_perm

# chmod: 2 files
#  user: read and write
#  group and others: read only
$ ls -l bin/
total 8
-rw-r--r-- 1 mktutes mktutes 21 Jul 29 03:49 hello.py
-rw-r--r-- 1 mktutes mktutes 19 Jul 29 03:49 hello.sh
Impact of the execute permission on files.
# let us run the shell script as command
# fails because user does not have execute permission
$ ./bin/hello.sh
-bash: ./bin/hello.sh: Permission denied

# hello.sh: set execute permission
$ chmod u+x bin/hello.sh

# user has execute permission now
$ ls -l bin/hello.sh
-rw-r--r-- 1 mktutes mktutes 41 Jul 29 03:52 hello.py
-rwxr--r-- 1 mktutes mktutes 19 Jul 29 03:49 hello.sh

# !! Works now
$ ./bin/hello.sh
Hello World
Add/remove write permission
# let us remove write permission from user on hello.sh
$ chmod u-w bin/hello.sh
$ ls -l bin/
-r-xr--r-- 1 mktutes mktutes 19 Jul 29 03:49 hello.sh

# add some text to hello.sh
$ echo 'echo -n "Date: "' >> bin/hello.sh
-bash: bin/hello.sh: Permission denied

# put write permission back, add execute to others and group
# chmod: allows multiple set of permission settings
$ ls -l bin/hello.sh
-r-xr--r-- 1 mktutes mktutes 19 Jul 29 03:49 bin/hello.sh

$ chmod u+w,o=rx,g+x bin/hello.sh

$ ls -l bin/hello.sh
-rwxr-xr-x 1 mktutes mktutes 19 Jul 29 03:49 bin/hello.sh

# Let us try writing to hello.sh
$ ./bin/hello.sh
Hello World

$ echo 'echo -n "Date: "' >> bin/hello.sh
$ echo 'date' >> bin/hello.sh
$ ./bin/hello.sh
Hello World
Date: Thu 29 Jul 2021 04:02:42 AM UTC
Add/Remove read permission
$ ls -l bin/hello.py
-rw-r--r-- 1 mktutes mktutes 57 Jul 29 04:14 bin/hello.py
$ cat bin/hello.py
print("Hello World")

$ python3 bin/hello.py
Hello World

# remove read from user
$ chmod u-r bin/hello.py
$ ls -l bin/hello.py
--wxr--r-- 1 mktutes mktutes 57 Jul 29 04:14 bin/hello.py
$ cat bin/hello.py
cat: bin/hello.py: Permission denied

# add read back to user
$ chmod u+r bin/hello.py
$ cat bin/hello.py
print("Hello World")
chmod with octal representation
The octal representation has a simpler syntax compared to chmod with symbols. It accepts 3 octal numbers; 0777 for example and assigns corresponding permission combination to user, group and others. Existing permission will be discarded and the new permission will be set for user, group and other at the same time.
The first, second and third octal numbers represent user, group and others respectively.
Here are some examples
| Octal | Description |
|---|---|
0777 |
set read, write and execute permission to all (user, group and others) |
0644 |
set read and write permission to user and read-only to group and others |
0750 |
set all permission to user, no permission to others and read-write to group |
# user has all permissions, group and others read-only
$ ls -l bin/hello.py
-rwxr--r-- 1 mktutes mktutes 57 Jul 29 04:14 bin/hello.py

# user: all, group: read and execute, others: none
$ chmod 0750 bin/hello.py
$ ls -l bin/hello.py
-rwxr-x--- 1 mktutes mktutes 57 Jul 29 04:14 bin/hello.py
id: view user info
The id command is used to get information about the current user or any userid passed as argument. Using this command, we can get
- userid and effective user id (numeric value)
- default group name and group id (numeric)
- other groups the user belong to.
When the user creates a file or directory, the userid and the default group will be used by default. We can change the ownership using the chown command and one of the groups instead of the default group using the chgrp command.
**id: current user info
# user mbose has only one group
$ id
uid=1001(mbose) gid=1002(mbose) groups=1002(mbose)
id: another user info
# user mktutes is associated with 4 groups
$ id  mktutes
uid=1000(mktutes) gid=1001(mktutes) groups=1001(mktutes),4(adm),27(sudo),999(docker)
groups: view group info of an user**
The groups command provides a simplified input compared to the id command. It just lists the list of groups associated with the current user, if no argument is provided or lists the groups of another user passed as argument
groups: current user
$ echo $USER
hradmin
$ groups
admin all
groups USERID: another user
# user mktutes has 4 groups
$ groups mktutes
mktutes : mktutes adm sudo docker
chown: change ownership associated with file
The chown command is used to change the ownership of a file or set of files. Only the owner or the super-user can make this change.
$ pwd
/home/mktutes/trng/linux/07_perm/data/mbose

# super-user
$ echo $USER
mktutes

# sample files
$ ls -l
-rw-r--r-- 1 mktutes mktutes 0 Jul 29 15:49 sample.csv
-rw-r--r-- 1 mktutes mktutes 0 Jul 29 15:49 sample.log
-rw-r--r-- 1 mktutes mktutes 0 Jul 29 15:49 sample.txt

# chown as super-user, new owner is mbose
$ sudo chown -v mbose sample.*
changed ownership of 'sample.csv' from mktutes to mbose
changed ownership of 'sample.log' from mktutes to mbose
changed ownership of 'sample.txt' from mktutes to mbose

$ ls -l
-rw-r--r-- 1 mbose mktutes 0 Jul 29 15:49 sample.csv
-rw-r--r-- 1 mbose mktutes 0 Jul 29 15:49 sample.log
-rw-r--r-- 1 mbose mktutes 0 Jul 29 15:49 sample.txt
chgrp: change group associated with file
The chgrp command is used to change the group associated with a file or set of files. Only the owner or the super-user can make this change.
In the previous section, we changed the owner of the files using chown. Let us check the groups that the new owner belongs to and change the group of these files.
$ id mbose
uid=1001(mbose) gid=1003(dev) groups=1003(dev),4(adm),999(docker),1004(all)

# chgrp: let us change the group of sample.* files
# existing group: mktutes
# new group: all
$ sudo chgrp -v all sample.*
changed group of 'sample.csv' from mktutes to all
changed group of 'sample.log' from mktutes to all
changed group of 'sample.txt' from mktutes to all

$ ls -l sample.*
-rw-r--r-- 1 mbose all 0 Jul 29 15:49 sample.csv
-rw-r--r-- 1 mbose all 0 Jul 29 15:49 sample.log
-rw-r--r-- 1 mbose all 0 Jul 29 15:49 sample.txt
passwd: change password
The passwd command is used to change or reset the password. Regular users can run this command without any argument to reset their password. The super-user can reset the password for other users by passing the userid as argument
Change Password: Success
$ echo $USER
mbose

# enter current and new password
$ passwd
Changing password for mbose.
Current password:
New password:
Retype new password:
passwd: password updated successfully
Invalid current password: ABORT
$ passwd
Changing password for mbose.
Current password:
passwd: Authentication token manipulation error
passwd: password unchanged
Retype new password: Mismatch
$ passwd
Changing password for mbose.
Current password:
New password:
Retype new password:
Sorry, passwords do not match.
passwd: Authentication token manipulation error
passwd: password unchanged
Reset password as super-user using the sudo command
$ sudo passwd mbose
New password:
Retype new password:
passwd: password updated successfully
Create Users and Groups
Caution:
The below commands are for demo only. If you are root user or have super-user privilege on a Linux Server, you can try these commands. DO NOT TRY this on your Linux Desktop. The sudo and su commands should be treated with caution.
Setup Users and Groups
# sudo: run commands as super-user and create home dirs for users
$ sudo mkdir sysadmin dbadmin itadmin mbose sholmes

# create groups
$ sudo groupadd admin
$ sudo groupadd dev
$ sudo groupadd all

# create users
$ sudo useradd sysadmin -d /home/sysadmin -g admin -G all
$ sudo useradd dbadmin -d /home/dbadmin -g admin -G all
$ sudo useradd itadmin -d /home/itadmin -g admin -G all
$ sudo useradd mbose -d /home/mbose -g dev -G all
$ sudo useradd sholmes -d /home/sholmes -g dev -G all