1.3: File System: Basics
Chapter 3
This topic is still in progress Please check later…
Introduction
File System is one of the core components of any operating system. It provides a well-defined structure to store, organize and retrieve content and the metadata associated with the file such as owner, permissions, size, timestamps etc.. Each operating system has its own File System definition, for example Windows uses NTFS and Mac uses APFS. Both Windows and Mac supports old FAT32 file system.
A File can be informally defined as the collection of records and fields also known as data that are stored as stream of bytes. It is the smallest logical unit of storage in the OS.
A directory is a container to store other directories and files. It is a special type of file that contains the references to itself, the parent and other files and directories stored in it.
Unix and Unix-like OS use the HFS - Hierarchical File System. Though each Unix-like OS may have a unique name for the file system such as JFS, ext3, ext4, these are simple the implementations of the HFS - the original file system of the Unix operating system. Each of these file system may have extended attributes such as maximum size limits per each file and the file system itself.
In this chapter, let us discuss the following topics
- The features of the file system, how files are organized and the metadata stored along with the contents
- Path: textual representation that uniquely identifies file or a directory
- Wildcards: patterns to access one or more files
- Commands: create, access, delete, list files and directories
HFS: Hierarchical File System
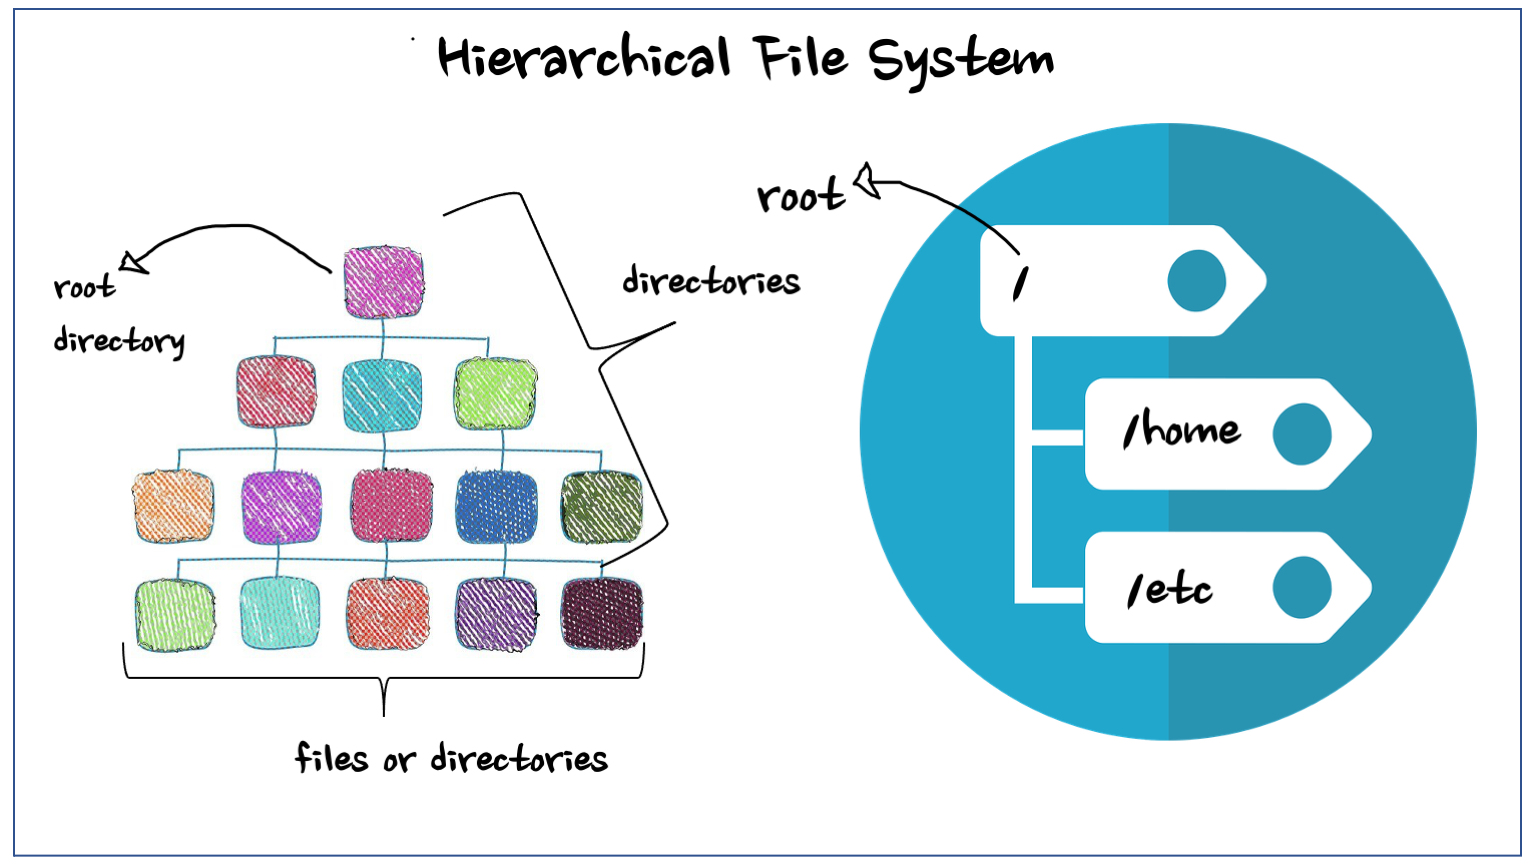
Unix treats everything as files; data, source code, executables, even devices such as display, hard disks. The HFS provides a standard way to store and access these files. As the name suggests, Hierarchical FS is a tree-like structure that has nested directories and files. A directory that resides within another directory is called a sub-directory.
The HFS has single entry point called the root directory. It is represented by the backslash / not the name root. This is an important distinction to remember. Every file and directory in the system is nested under the root directory, even when you attach devices such as USB, these devices will show up under the root directory. This is another difference between Windows and Unix OS. In Windows, each device will show up as independent drives E:, G: etc..
Images by Gerd Altmann from Pixabay and mcmurryjulie from Pixabay
Here is the graphical representation of the common directories and files we would see under the root directory.
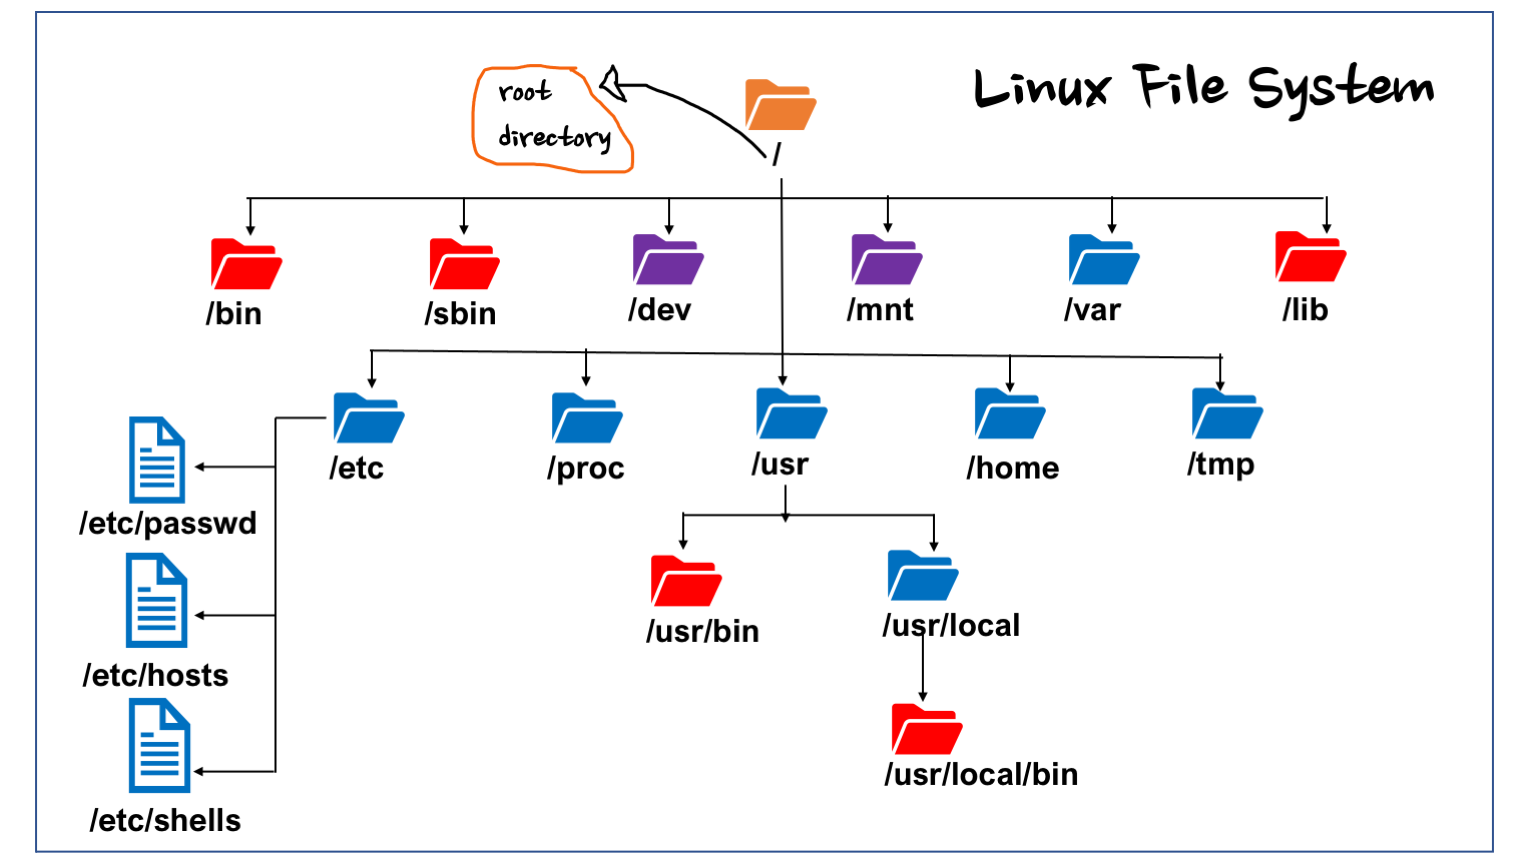
The above illustration is not all inclusive but a snapshot of the common directories and files we will see in Unix-like systems. These directories contain commands, config files and other info needed for the proper functioning of the system.
bin: contains commonly used commands such asecho,ls;binis the short form for binariessbin: system binaries that are mostly used by sysadminsdev: contains device specific files;tty*for displays,sda*for hard-drives and other logical devices like/dev/nulland/dev/urandometc: contains system configuration files. For example/etc/shellscontains list of available shellstmp: store temporary files that are periodically cleaned up.usr: contains commands that are installed separately, non-core commands, interpreters etc…home: contains one directory per user that can logon to the system./home/admin,/home/dbuseretc..lib: contains system librariesvar: contains growing files such as logs, databases. Most of the directories under the root directory won’t grow drastically in size except thevarandhomedirectories
Path
In the chapter about command syntax, we saw that files and directories can be passed as arguments to commands. In order to access the files, we need an unique way of identifying the files. The path is a textual representation that can uniquely identify any file or directory in the system.
There are two ways we can represent the file path.
- Absolute Path
- Relative Path
Absolute Path
As the name suggests, an absolute path is a representation that will never change for a given file. It starts with the root directory followed by the sub-directory names and that may end with a file or directory name. The sub-directories are delimited by the path separator /
The character
/has two roles; when it appears at the start of the path, it represents the root directory and when it appears in between, it is called the path separator.
The absolute path name always starts with a / that represents the root directory. For example /usr/bin/awk is the absolute path of the awk command.
Absolute Path Examples
/home/dbuser/bin/list_old_files.sh: a shell script inside the home directory of an user calleddbuser/etc/shells: a system config file that contains the list of available shells/tmp/tmp.knD5sAulSZ: an ephemeral file created by some process that will be cleaned up once the process is completed or by the operating system
Relative Path
Unlike the absolute path that is always same for any given file, the relative path will not be the same. The value of relative path of a given file is determined based on the current working directory the user is in or the command is running from.
REMINDER: The user will be placed in the home directory of the user upon login and the user is always at one directory or another during the login sessions in order to interact with the system.
We can use some short-hand notations in the table given below to construct the relative path.
| Symbol | Description |
|---|---|
/ |
the path separator, that delimits directories in the path |
. |
reference to the current directory, can be used as a shortcut |
.. |
reference to the parent directory |
~ |
shortcut to the home directory of the current user |
~admin |
shortcut the home directory of the user called admin |
Relative Path Examples
data/input/sample.txt: refers to the filesample.txtthat is insideinputwhich again is insidedatadirectory of the current directory (pwd)../../data: go two level up from the current directory and access thedatadirectory~/bin/main.sh: refersmain.shthat is inside thebindirectory of the current user’s home directory. This is not exactly a relative path, this one uses one of the path’s shortcut available that is~(home directory of the current user)~dbuser/bin: refers thebinthat is under the home directory of userdbuser
Absolute vs Relative Paths
Using the below tree structure3, let us see few examples of absolute and relative paths of few files and directories listed here.

Let us say the current location of the user in the shell is /home/admin. The result we get when we run the pwd command. For the sake of demo, we have kept all directory and file names unique.
| To access | Absolute Path | Relative Path |
|---|---|---|
bin |
/home/admin/bin |
bin |
~/bin |
||
in |
/home/admin/data/in |
data/in |
~/data/in |
||
mysqld.log |
/home/dba/log/mysqld.log |
../dba/log/mysqld.log |
~dba/log/mysqld.log |
||
proj |
/proj |
../../proj |
scores.dat |
/home/admin/data/out/scores.dat |
data/out/scores.dat |
Both type of path’s have their own pros and cons. Here is a brief summary
| Absolute Path | Relative Path |
|---|---|
Starts with the root directory / |
starts with a directory name or some shortcuts like .., .. never starts with the / that is the root directory |
| Always remains the same | Changes based on the current directory |
| no ambiguity | works best in environments that follows standard directory structure |
| may be longer | may be shorter than the corresponding absolute path |
File System Commands: Part I
This section covers commands that are used to create files and perform operations on these files, such as access, copy, move, delete etc.. Here is the list of commands we will deal with examples
In this chapter, we will look at a set of File System commands and in the following chapter, we will discuss wildcards and another set of commands
| # | Name | Description |
|---|---|---|
| 1 | mkdir |
create directory |
| 2 | cd |
change directory |
| 3 | rmdir |
remove empty directories only |
| 4 | touch |
create an empty file if it doesn’t exists |
| 5 | file |
determine file type |
| 6 | ln |
create link to an existing file; hard or soft link |
| 7 | tree |
list a directory contents in a tree like format |
mkdir : create directories
The mkdir (make directory) command accepts a path as an argument and creates the innermost directory name in the path by default. It errors out if the directory already exists or if some intermediate directories in the path does not exist already.
Commonly used options
| Option | Description |
|---|---|
-v |
enable verbose mode. |
| displays a message when the directory is created successfully. | |
Same as --verbose |
|
-p |
creates intermediate directories in the path, if not exist. |
Same as --parents |
|
-m MODE |
override default permission using an octal string. More on this later. |
Create one or more directories
# display current directory
$ pwd
/home/mbose/demos/hfs/dir

# list files and directories at cwd
$ ls

# mkdir: no flags, creates directory, no messages
$ mkdir
$ ls
data

# option: -v or --verbose - display dir creation message
$ mkdir -v data/input
mkdir: created directory 'data/input'
$ ls data
input

# mkdir: create multiple dirs at same level
$ mkdir -v bin etc log
mkdir: created directory 'bin'
mkdir: created directory 'etc'
mkdir: created directory 'log'
MK@gshell dir $ ls
bin  data  etc  log
Create parent directories as needed
# mkdir: errors out if sub-directories do not exist
$ mkdir config/db
mkdir: cannot create directory ‘config/db’: No such file or directory

# option: -p or --parents: creates sub-directories as needed
$ mkdir --parents --verbose config/db
mkdir: created directory 'config'
mkdir: created directory 'config/db'
cd : change directory
When an user logs in, the first default directory (s)he will be places is the user’s home directory /home/userid. In order to work in the shell, the user has to move from one directory to another frequently. The cd command is used to change user’s current directory.
The cd command accepts one argument that is a path (relative or absolute) of a directory. If no arguments are provided, then cd uses the current user’s home directory as default argument.
Note: The - has a special meaning for cd. It will substitute the previous working directory and executing the cd - command will take the user back to the previous working directory. Executing cd - consecutively mimics the Alt + Tab like operation of Windows environment. The cd - will display the directory name it is going to switch
cderrors out if the directory provided as argument does not exists or it exists but it is not a file. If the user does not have permission to access a valid directory, it would cause an error
$ pwd
/home/mbose/trainings/demos/hfs/dir

# cd: defaults to user's home dir
$ cd
$ pwd
/home/mbose

# cd: with argument
$ cd data/input
$ pwd
/home/mbose/demos/hfs/dir/data/input

# cd - : changes back to previous working directory
$ cd -
/home/mbose/trainings/demos/hfs/dir
$ pwd
/home/mbose/trainings/demos/hfs/dir
Errors:
$ ls
bin  config  data  etc  log  sample.txt

# cd: directory does not exist
$ cd temp
-bash: cd: temp: No such file or directory

# cd: not a directory
$ cd sample.txt
-bash: cd: sample.txt: Not a directory

# cd: inadequate permission
$ cd etc/
-bash: cd: etc/: Permission denied
rmdir : remove “empty” directories ONLY
The rmdir command is used to delete directories that are empty. It accepts If there are files or other directories then we need to use the rm command that will be discussed later in this chapter.
The rmdir also supports the -p and -v; parents and verbose options like the mkdir command. The -p option takes a path and deletes the innermost directory first and traverse back and delete as long as the current directory it is trying to delete is empty
Examples: Delete empty directories
$ ls
bin  config  data  etc  log

# rmdir: no option, silently deletes dir, if empty
$ rmdir bin
$ ls
config  data  etc  log

# rmdir -v: display a message about the dir being deleted
$ rmdir -v etc
rmdir: removing directory, 'etc'
$ ls
config  data  log

# we can delete multiple directories at the same time
$ mkdir temp
$ ls
config  data  log  temp
$ rmdir -v temp log
rmdir: removing directory, 'temp'
rmdir: removing directory, 'log'
$ ls
config  data
Errors:
# invalid dir: not exists
$ rmdir backup
rmdir: failed to remove 'backup': No such file or directory

# argument is a file
$  rmdir sample.txt
rmdir: failed to remove 'sample.txt': Not a directory

# insufficient permission; created by root user
$ rmdir etc
rmdir: failed to remove 'etc': Operation not permitted
touch : create empty files
The touch command can be used to create an empty file, if it does not exists. It changes the file’s access and modification timestamps, if the file exists. This command is an useful utility for beginners to create files and play around with commands, at the same time it is powerful enough to be used to trigger events by changing the access / modified timestamps. The files with updated timestamps will be picked up by file listener events and services
If a file name starts with a dot
., it will not be visible automatically when we list files. These files are called hidden files or dotfiles and these need special options to be displayed
|Options|Description|
| -a | change only the access time, do not change modified time |
| -a | change only the modified time, do not change access time |
| -d | uses the argument instead of current time; --data=STRING |
| -t | accepts a timestamp and use it as current time|
We will do a demo on
-dand-talong with thelscommand
$ ls
config    data

$ touch sample.txt sample.csv
$ ls
config  data  sample.csv  sample.txt
file : determine file type
The file command accepts a file as an argument and tries to determine the type of file by looking at various features like known file extensions, checking file stats for emptiness, character checks for ASCII or binary format etc.. The command prints the type of the first passed test. If it cannot determine anything, it simple prints data
Create sample files and directories for demo
$ mkdir temp
$ file temp
temp: directory

$ touch sample.txt
$ file sample.txt
sample.txt: empty

# an existing text file
$ file /etc/shells
/etc/shells: ASCII text

# an executable
$ file /usr/bin/perl
/usr/bin/perl: ELF 64-bit LSB pie executable, x86-64, version 1

# compressed zip file
$ file backup.zip
backup.zip: Zip archive data, at least v1.0 to extract

# compressed gzip file
$ file tarball.tgz
tarball.tgz: gzip compressed data, last modified: Fri Jul  9 13:44:48 2021, from Unix, original size 10240

# contains random ascii char from /dev/urandom
$ file random.bin
random.bin: data
ln : create links or shortcuts
The ln command is used to create shortcut to an existing file or directory. There are two type of links we can create; hard links and soft or symbolic links
A hard link is an additional name for an existing file. If the original file is deleted, we can still access the data using the hard link. We cannot create hard links for directories. Both files will be pointing to the same inode, an unique number assigned to each file created in the system.
A soft link like the shortcut in the Windows environment. We can create a soft or symbolic link for both files and directories. If the original file is deleted, the symbolic link will remain broken and accessing that link will cause error
Links are useful in many ways; we can create a short name as symbolic link to frequently used files and directories. For applications, that need to access the latest file from a given set of files with the date in it, the process that creates these files can create a symbolic link and the application can use the link instead of the actual latest file.
| Options | Description |
|---|---|
-v |
enable verbose mode |
-s |
create symbolic link, hard link will be created by default |
-t DIR |
directory name on which the link should be created |
$ ls
config date

 regular files
touch weblog_20210705.log weblog_20210706.log

# create symbolic link
ln -s weblog_20210706.log weblog.log
$ file weblog.log
weblog.log: symbolic link to weblog_20210706.log

# create hard link: both original and link has same inode
$ ln weblog_20210705.log weblog
# ls -1i : displays file and its inode, one per line
# **Note**: both files have same inode 133719
$ ls -1i weblog weblog_20210706.log
133719 weblog
133719 weblog_20210706.log
tree : display contents of directory recursively
The tree command displays all the sub-directories and files under the current directory (default). We can explicitly pass a directory as argument
| Options | Description |
|---|---|
-a |
print all files, including hidden files |
-d |
print directories only, discard files |
-L N |
print only N sub-levels of nested directories |
-f |
display full relative path for each file and directory |
-o FILE |
send output to FILE instead of screen |
The
treecommand is not installed by default in many OS (google cloud shell) or emulators likecygwin.
Create sample files and directories
$ mkdir tree_demo
$ cd tree_demo
$ mkdir -p processor/intel/i3/{bin,data,etc,log}
$ mkdir -p processor/intel/i3/data/{in,out}put
$ touch processor/intel/i3/log/cycled.log
$ touch processor/intel/i3/data/run_1a.dat
$ touch processor/intel/i3/data/input/source.dat
$ touch processor/intel/i3/data/output/{xa,xb,xc}.dat

$ touch processor/intel/i3/bin/.config
tree demo
$ tree
.
└── processor
    └── intel
        └── i3
            ├── bin
            │   └── main.sh
            ├── data
            │   ├── input
            │   │   └── source.dat
            │   ├── output
            │   │   ├── xa.dat
            │   │   ├── xb.dat
            │   │   └── xc.dat
            │   └── run_1a.dat
            ├── etc
            └── log
                └── cycled.log
Display directories only, discard files
$ tree -d
.
└── processor
    └── intel
        └── i3
            ├── bin
            ├── data
            │   ├── input
            │   └── output
            ├── etc
            └── log
Limit levels of sub-directories
$ tree -d -L 3
.
└── processor
    └── intel
        └── i3
Display Hidden Files
# display hidden file .config
$ tree -a processor/intel/i3/bin
processor/intel/i3/bin
├── .config
└── main.sh
Save output in file instead of display on screen
$ tree -d -L 3 -o tree.out
# display file using `cat` command
$ cat tree.out
.
└── processor
    └── intel
        └── i3
…to be continued in part 2